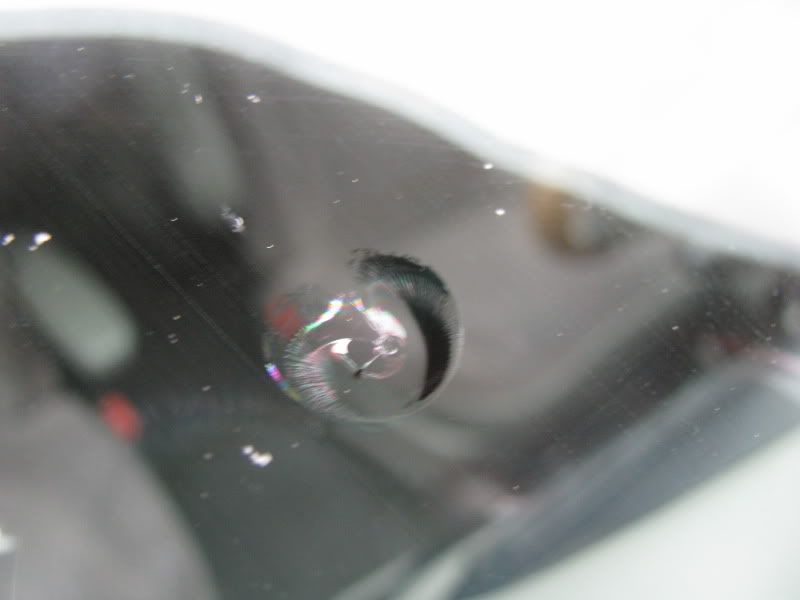
Looks like you still have some air in there.
Dont tighten the injector so much. Make sure it is level
Back off the injector until it just begins to leak and then tighten 1/4 turn.
Did you use the drystar to dry out the damage before you started?
Did you flex the damaged area from the inside?
If you apply heat to the damaged area, make sure it cools down properly before you apply the cure tab. Otherwise you will get air spots.
Post your before and after pics here!!!
-
Mr Bill

- Senior Member
- Posts: 523
- Joined: February 9th, 2005, 6:15 pm
- Enter the middle number please (3): 5
- Location: Santa Cruz CA
-
screenman
- Senior Member
- Posts: 3192
- Joined: February 25th, 2004, 1:44 pm
- Enter the middle number please (3): 5
- Location: uk Lincolnshire
Re: Post your before and after pics here!!!
Flexing a break like that from the inside would shut it up whilst trying to fill it, in my opinion there would be zero benefit in flexing a break like the one shown. I would agree with your other comments though.
It is very important when carrying out repairs to really build up a 3D picture of the break in your head. No point pushing a bullseye from inside for obvious reasons, whilst certain starbreaks with legs open too the surface may benefit, I would I only flex from inside a couple of times each years. However I do flex from outside on most repairs.
Without sounding harsh which I am sure this will do, I would not be happy for anyone I have trained to turn out a job like that, keep asking and keep practising and you will get there.
Best of luck.
-
jkjerde
Re: Post your before and after pics here!!!
wow, Thanks for all the feedback everyone.
2 things I believe is wrong with this.
I do believe I used slightly too much pressure. 2nd, I did not use a moisture evaporator.
Has anyone made do with a lighter for a moisture evaporator? I know this is not the probably tool but will it work decent?
I am sitting here laughing because the guy who has a mobile set up across the street from my work fixed my windshield like 2 weeks ago. Compared to the picture I posted above he did a HORRIBLE JOB . I am tempted to call my insurance company and complain. What are the odds of my drilling out his work and doing it again with it turning out decent? I'll post a pic tonight of his work. He didn't even scrap it off right. I have a indent on my windshield.
2 things I believe is wrong with this.
I do believe I used slightly too much pressure. 2nd, I did not use a moisture evaporator.
Has anyone made do with a lighter for a moisture evaporator? I know this is not the probably tool but will it work decent?
I am sitting here laughing because the guy who has a mobile set up across the street from my work fixed my windshield like 2 weeks ago. Compared to the picture I posted above he did a HORRIBLE JOB
-
jkjerde
Re: Post your before and after pics here!!!
Screenman,screenman wrote:Flexing a break like that from the inside would shut it up whilst trying to fill it, in my opinion there would be zero benefit in flexing a break like the one shown. I would agree with your other comments though.
It is very important when carrying out repairs to really build up a 3D picture of the break in your head. No point pushing a bullseye from inside for obvious reasons, whilst certain starbreaks with legs open too the surface may benefit, I would I only flex from inside a couple of times each years. However I do flex from outside on most repairs.
Without sounding harsh which I am sure this will do, I would not be happy for anyone I have trained to turn out a job like that, keep asking and keep practising and you will get there.
Best of luck.
No hard feelings, I love feedback. Unfortinaltey training from an experience technician really isin't possible so I will be practicing a lot before I "Live"
-
Kgobin
- Moderator
- Posts: 1107
- Joined: June 5th, 2008, 11:03 am
- Enter the middle number please (3): 3
- Location: Champaign, IL
- Contact:
Re: Post your before and after pics here!!!
Typically, a lighter is used to heat a break from the inside of the vehicle and a moisture evaporator is used to remove fluid from the inside of the break. Also, The intense heat from the moisture evaporator will also help break down hydrophobic coatings and waxes. Lastly, using 0000 steel wool is an extra precaution that ensures all the hydrophobic coating or wax is removed and the pit resin will adhere to the glass properly.jkjerde wrote:Has anyone made do with a lighter for a moisture evaporator? I know this is not the probably tool but will it work decent?
Additionally, I would like to formally invite you to Delta Kits Factory Training & Certification Course in Eugene, Oregon at your earliest convenience. The course is aimed at teaching windshield repair technicians the proper skills to be successful in the industry.
Korey Gobin
Delta Kits, Inc.

Delta Kits, Inc.
-
revive
- Junior Member
- Posts: 42
- Joined: August 18th, 2008, 2:38 pm
- Enter the middle number please (3): 5
- Location: Inverness
Re: Post your before and after pics here!!!
Bring The Show to Lincoln ..or InvernessKgobin wrote:Typically, a lighter is used to heat a break from the inside of the vehicle and a moisture evaporator is used to remove fluid from the inside of the break. Also, The intense heat from the moisture evaporator will also help break down hydrophobic coatings and waxes. Lastly, using 0000 steel wool is an extra precaution that ensures all the hydrophobic coating or wax is removed and the pit resin will adhere to the glass properly.jkjerde wrote:Has anyone made do with a lighter for a moisture evaporator? I know this is not the probably tool but will it work decent?
Additionally, I would like to formally invite you to Delta Kits Factory Training & Certification Course in Eugene, Oregon at your earliest convenience. The course is aimed at teaching windshield repair technicians the proper skills to be successful in the industry.
-
Kgobin
- Moderator
- Posts: 1107
- Joined: June 5th, 2008, 11:03 am
- Enter the middle number please (3): 3
- Location: Champaign, IL
- Contact:
Re: Post your before and after pics here!!!
We do offer On The Road Training but it's typically in conjunction with trade shows. For example, we had On The Road Training in Florida during the Mobile Tech Expo and in Texas during the South West Car Wash Association Convention and Expo. You are always welcome to visit Eugene, Oregon where we conduct training monthly.
Korey Gobin
Delta Kits, Inc.
Delta Kits, Inc.
-
revive
- Junior Member
- Posts: 42
- Joined: August 18th, 2008, 2:38 pm
- Enter the middle number please (3): 5
- Location: Inverness
Re: Post your before and after pics here!!!
HiKgobin wrote:We do offer On The Road Training but it's typically in conjunction with trade shows. For example, we had On The Road Training in Florida during the Mobile Tech Expo and in Texas during the South West Car Wash Association Convention and Expo. You are always welcome to visit Eugene, Oregon where we conduct training monthly.
The invitation was a little tongue in cheek ..the invite was over the pond in Europe/UK..not US!
-
Kgobin
- Moderator
- Posts: 1107
- Joined: June 5th, 2008, 11:03 am
- Enter the middle number please (3): 3
- Location: Champaign, IL
- Contact:
Re: Post your before and after pics here!!!
I know that you are in northern Scotland the home of "The Northern Meeting". Do you ever attend it?
Korey Gobin
Delta Kits, Inc.
Delta Kits, Inc.
-
jkjerde
Re: Post your before and after pics here!!!
Here is another one I did. I am trying to figure out why I am getting a light gray color on top where my pit resin is, sometimes I don't, hmmmmmmmm.
Before
After

NO I am not repairing for customers.
I have some beauties I will post here in a while of the quality that is done in my area. 2 on my in-laws and 1 on my van. NOT.......
Before
After
NO I am not repairing for customers.
I have some beauties I will post here in a while of the quality that is done in my area. 2 on my in-laws and 1 on my van. NOT.......
Who is online
Users browsing this forum: No registered users and 48 guests